Thursday, August 19, 2010

Basketry-recycled material -A- Introduction and single weave.


PLASTIC PACKING STRAPS ARTICLES

by Jemima Lau

Introduction

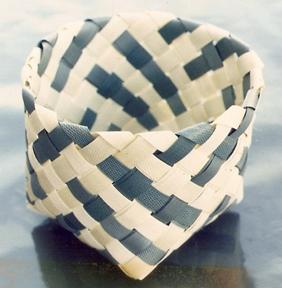
Everyday, meters of colorful binders or packing straps used for packaging materials are thrown away. The smaller ones are heat sealed and the thicker ones are secured with metal holders. They are made of plastic, nylon or polyester. These can be collected to make useful baskets, table mats, coasters and balls. These binders are of many colors and different thickness and width – ¾ cm, 1 cm, 1 ½ cm, 1 ¾ cm, 2 cm and 2 ½ cm. Some are slightly thicker and harder and others are thinner and softer.


I saw a friend from Sarawak make baskets from unwanted cardboard cut into strips. Then I noticed that each day we throw away these packing straps tying bundles of newspapers in the school library. So I asked this friend to make a basket from the binders and behold a beautiful handicraft.


Collecting the straps is easy, just ask any shopkeeper or proprietor who has boxes coming in to keep them for you. Newspaper agencies and bookshops have loads of them. On a building site there are really thick long ones which are strong enough to tie bricks and other building materials. These make very strong baskets for growing plants but is slightly hard to weave. I saw a five feet wide mat woven from it in Sarawak. Nice to put it on a cold cement floor.


I make balls,tablemats and baskets etc. Cut the bigger binders with a cutter, the thinner ones can be cut with scissors. Clean them with a piece of wet cloth and detergent or soak them in detergent water from the washing machine and wipe them again after cutting them. Use knitted cotton gloves to do your weaving if you like.
You will also need a pair of tweezer-like pliers to fold and a small metal rod to move the straps to the position you want.


1. SINGLE WEAVE SQUARE BASKET AND RECTANGULAR BASKET


Single weave means one up/over and one down/under.


Do a square or a rectangular base with single weave and use a raffia string to tie all round to secure the base.


Then fold up all the four sides to stand the straps. Then use separate long straps and weave all around in a square or rectangular following the base. Use the raffia string to secure the horizontal first two straps after which the walls will take shape.


Put the number of horizontal rows to the height you want. End the edge or the last row by folding down the alternate straps straight down covering the plastic strap. Use a small pair of pliers to fold if the straps are hard.


Cut and tug in so that the end of the strap is tugged in a weave and it does not show. Another strap is needed to fold in the alternate straps of the last row and to go over the double weave, thereby making the last row firmer.


Put a long strong strap for the handle, go through the two central lines and up to the top, twice or three times. These are very strong baskets. You can vary the size by the number of straps u use. You can make square or rectangular ones.


SINGLE WEAVE BASKET WITH HANDLE IN CENTRE – THREE COLOR COMBINATION.


SQUARE BASKET WITH HANDLE IN CENTER - TWO STRAPS OF SAME COLOR DESIGN.


THIS DESIGN MAKE GOOD BASKETS FOR PLANTING ORCHIDS AND THEY ARE LIGHTER THAN CLAY POTS, THUS SAFER AND THEY EMIT WATER.


I made a big baby basket with this design. You need to collect the very long straps. Weave two or three straps in for handles on the longer sides of the rectangular basket .Go right through the bottom of the basket and come out the other side and reweave to make the side of the handle.


Baskets can be made with stands to make it look neater. You have to use straps long enough to weave down and up again. End the last row weave right down and put in extra row. Turn around weave up and tug in straps under weave and cut off.
This shows bottom of basket and is made with blue and white alternately.


You can vary the designs by using two red and one white as shown basket on left, or two blue and two white as shown on right.

Wednesday, August 18, 2010

Basketry using plastic straps -B- SW Corner Sq

2. SINGLE WEAVE CORNER SQUARE BASKET


To begin take the two longest strips of the same color (blue) and cross them with another two longest strips, weaving one up/over and the other down/under as in diagram and I call this the double crossroads.


Then cut 4 strips of another color (yellow in photo and diagram ) two inches shorter than the first four blue strips. Interweave around the first 4 strips following the diagrams because if there are two colors, it is easier to see. Weave the same color if you want a plain basket.


The next 4 strips are of the same colour (blue) as the first 4 and two inches shorter than the last 4 (yellow) ie the second 4. It does not matter if some strips are not of the same length as they can be woven in.


Weave the number of strips you want depending on the size you want, adjust to tightness you want. Use a raffia string to tie the four crossroads to hold the base together.


To get the four corners, crisscross at the crossroads and weave the strips to the left and to the right at 90 degrees to form the corner and weave up to the height you want.


End the basket by folding in to get a smooth edge. Use a tweezer-plier to fold in all the strips at an angle (horizontally) to the right first and weave all the way to end of strips. The length of the strips does not matter, cut short of a weave and tug in so that the end of the strip does not show.


Fold horizontally the other strips to the left and do the same. This is harder to make compared to the zigzag edge below and needs to be regular if not the basket will go crooked.


The two baskets are made by weaving odd rows of one color and even rows of another color ended with smooth edge. The pattern will come out differently if you have even rows of two colors.


If you start at the crossroads with one or two colors and end the last row of the base with the same color, you will get a single or double crossroads pattern on the four sides.


Smooth edge basket with a stand and weaved with a three colour combination.
Use long strips, turn at the edge, weave to the bottom, add one row and weave up again to the top, then tug in before the edge. ( refer to unfinished grey and red basket at top )


You can also end the zigzag way by folding straight to the right first and after the whole round fold to the left. Tug in the strips where it does not show and cut off. Use a metal rod with flat tip to push in strips or push strips to wanted position.


These two small shallow zigzag edge baskets are made using three colors strips.


If you make the single weave corner baskets loose and holey, they can be used for planting orchids. Again they are light and safe.


A basket will be more useful if it has handles, at the edge put through one or two strips to make handles for opposite sides.


Photo shows zigzag edge with double rows of handles using two colors strips alternately.


Use very long strips for the handles so that you weave them right to the bottom so that handles are sturdy.


Another view of basket with handle.


Single weave corner basket with zigzag collar or stand so that base is uplifted.


This is done by using long strips weaving to the bottom adding two or three rows and weaving up again to the top, then tug in before the edge.

Basketry - plastic packing strap -C- Double Weave


3. DOUBLE WEAVE SQUARE BASKET


Double weave means two up/over and two down/under and it is prettier than the single weave as it has a zigzag pattern. This is slightly complicated so I will describe in detail. Please refer to diagrams.


To start, take two of the same colour and cross them with another two of the same colour as in the diagram.


Then the second round of four colorless strips you need to put a single weave where as indicated by a "dot".


The third round of four strips continued with double weave.


The fourth round has to have a "dot" again: instead of just going over 2 under 2, you put the strip over 1 under 1 just once at the centre line.
The fifth round has no "dot"; you simply weave the strip over 2 under 2. Remember to end at single weave i.e. at even numbers of plastic strips.


If you follow this design ie a dark crossroad and then white strips after that you will get a design like the 1 cm grey and white high basket.


From the above diagram you can see that you will have to insert a single weave "x" at every second round only, it is the same as the "dot" in the diagram above this one. Notice the position of the single weave "x"; it changes always from right to left of the centre line. Note that the dark stripes are placed horizontally and the white strips are placed vertically. It looks very pretty at the base but the sides will be of one color only except for a few rows.


Tie the four sides where the crossroads are, to make sure the base does not shift. Now to make the corners, crisscross at 90 degrees at the crossroads and double weave all the way to the end of the two sides. Do the same for all four sides.


Also adjust the structures with the help of your fingernails or metal rod to move them close together. This design needs to be close unlike the single weave which can be holey. Now interweave the four sides and double weave all the way to the height you want or to as high as the length of the binders you cut.


To end by the smooth edge, fold one strip to one side and weave following the structure and fold the other one to the other side following the weaving pattern. In the photo the first fold is to the left follow by the right.


Two colors ( zigzag design )and three colors design (look at the first 2 photos.)


I made this basket from thin 1 cm wide shiny white and grey plastic strips used to tie the newspapers delivered to school. It is easy to manage and the basket is delicate and neat.


Observe the size of the black and white little basket made from size 1 cm wide strips, the other two baskets are made with 1 inch wide strips.


Two color combination double weave basket with handle and zig zag edge.


I use this basket as a pot for soil, it is so close that soil will not flow out. It is easy to lift around as it is lighter than clay pots and best of all it emits water and minimizes soil loss.


Double weave square basket can also be made with a stand below, weave to bottom of basket and add an extra row. I use two grey and one red strip to get this design.


Note that when you fold to the right first you get a smaller edging as in bottom of photo. If you fold to the left first you will get a wider v-design edging, also refer to photo in shapy baskets to see the bottom of stand basket.